This week we are going to look at the accelerometer. The accelerometer allows us to use the micro:bit to detect movement, whether this is counting steps, detecting if someone or something is falling.
There are two ways to use the accelerometer, either through the shake function or the acceleration block, We will be consentrating on the accelerometer block.
Let’s take a look at the code!
MakeCode
- Open MakeCode editor within your favourite browser
- Click and drag the on start block to the left and drop it in the bin
- Click on Variables Click on Make a Variable… Type reading and click on Ok
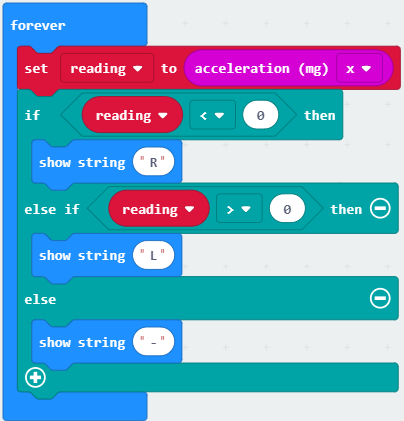
- Click on Variables Click on set reading to 0 and drag it to the coding area and attach it within the forever block
- Click on Input Click and drag acceleration (mg) x to the coding area and attach it within the 0 of the set reading to block
- Click on Logic click and drag a if true then else block to the coding area and attach it under set reading to acceleration (mg) x block
- Click on Logic Click and drag a 0 < 0 block to the coding area and attach it within the true of the if then block
- Click on Variables click and drag reading to the coding area and attach it within the first 0 of the if then block
- Click on Basic Click and drag a show string “Hello” block to the coding area and attach it under if reading < 0 then Click where it says Hello and type R Click on the small + below else
- Click on Logic Click and drag a 0 < 0 block to the code area and attach it within the blank space of the else if block
- Click on Variables click and drag a reading block to the coding area and attach it within the first 0 of the else if block
- Click on Basic Click and drag a show string “Hello” block to the coding area and attach it under else if reading > 0 then Click on **Hello and type L
- Click on Basic Click and drag a show string “Hello block to the code area and click on Hello and type -
Your code is now ready to download to your micro:bit and test out.
Completed Code
EduBlocks
- Open EduBlocks within your favourite browser and click on micro:bit
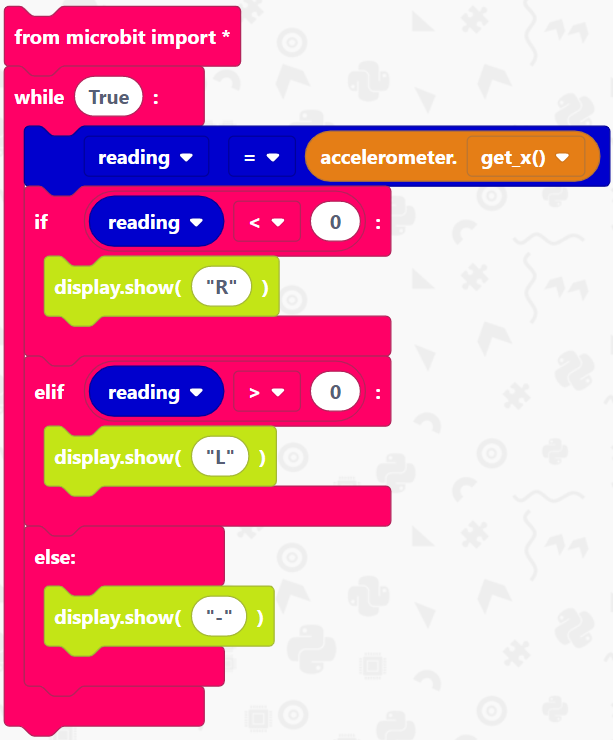
- Click on Basic Click on from microbit import
*and drop it within the coding area - Click on Basic Click on while True: and attach it under from microbit import
* - Click on Variables Click on Create variable… Type reading and click on OK
- Click on Variables Click and drag a reading = 0 block to the code area and attach it within while True
- Click on Accelerometer Click and drag a accelerometer.get_x() block to the code area and attach it within the 0 of the reading = 0 block
- Click on Basic Click and drag an if True: block to the coding area and attach it under reading = accelerometer.get_x()
- Click on Basic Click and drag a 0 == 0 block to the coding area and attach it within True of the if True: block. Click on the little arrrow next to == and click on <
- Click on Variables Click and drag reading to the code area and attach it within the first 0 of the if block
- Click on Display Click on display.show(Image.HAPPY) and drag it to the coding area and attach it under if reading < 0: Click where it says Image.HAPPY and type “R”
- Click on Basic Click and drag a elif True: block to the coding area and attach it under the if reading < 0: block
- Click on Basic Click and drag a 0 == 0 block to the coding area and attach it within the True of the elif True block. Click on the small arrow next to == and click on >
- Click on Variables Click and drag a reading block to the code area and attach it within the first 0 of the elif
- Click on Display Click and drag a display.show(Image.HAPPY) to the code area and attach it within the elif reading > 0 block Click on Image.HAPPY and type “L”
- Click on Basic Click and drag a else: block to the code area and attach it under the elif reading > 0
- Click on Display Click and drag a display.show(Image.HAPPY) block to the code area and attach it within the else: block. Click on Image.Happy and type "-"
Your code is now complete and read to download to your micro:bit to test it.
Completed Code
Python
- Open up your favourite Python editor for the micro:bit
- Type
from microbit import *This imports the micro:bit library to use within python so we can program with the micro:bit - Type
while True:This create a loop that will go on forever - Type
reading = accelerometer.get_x()This create a variable callled reading and sets it to the x axis of the accelerometer - Type
if reading < 0:This creates a statement to check if the micro:bit is tilted to the left - Type
display.show("R")If the micro:bit is tilted to the left it displays an “R” on screen to get you to tilt it back to the centre - Type
elif reading > 0:This checks to to see if the micro:bit is tilted to the right - Type
display.show("L")if the micro:bit is tilted to the right it displays an “L” on screen to get you to tilt the micro:bit back to the centre - Type
else:This checks to make sure the micro:bit is centre - Type
display.show("-")This displays a line on the screen if the micro:bit is sat centered.
Your code is now ready to download to the micro:bit and test out.
Completed Code
from microbit import *

while True:
    reading = accelerometer.get_x()
    if reading < 0:
        display.show("R")
    elif reading > 0:
        display.show("L")
    else:
        display.show("-")
Conclusion
You may have noticed that we have just created a simple spirit level, so you can now go and check whether the surfaces within your house or classroom are level.
I have shown you one way here to use the accelerometer another way is to use the on shake function.
Hope you enjoyed this and come back next week where we explore the temperature sensor.