Welcome to another micro:bit Monday post. Today we will be looking at what we can do with the buttons on the micro:bit.
MakeCode
Here is how to use the buttons within the Microsoft MakeCode editor.
- Open MakeCode within your favourite browser.
- Click and drag the forever block from the coding area to the left side of the screen and drop it in the bin.
- Click on Basic. Click and drag a show string “Hello!" block to the coding area and attach it within the on start block.
- Within the show string block click on “Hello!" and type Press button A.
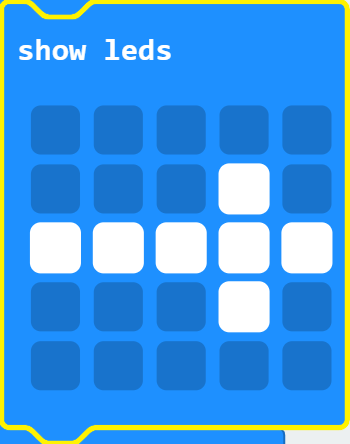
- Click on Basic. Click and drag a show leds block to the coding area and attach it under the show string “Press button A” block.
Create an arrow pointing left like this:

- Click on Input. Click and drag an on button A pressed block to the coding area and drop it.
- Click on Basic. Click and drag a show icon block to the coding area and attach it within the on button A pressed block. Change the icon by clicking on the white arrow to a happy face.
- Click on Basic. Click and drag a show string “Hello!" block to the coding area and attach it under the show icon block. Now change the text to read Press button B.
- Click on Basic. Click and drag a show leds block to the coding area and attach it under show string “Press button B block.
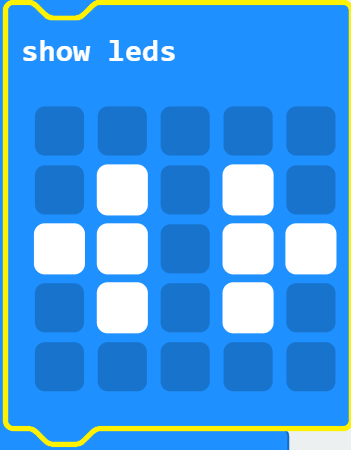
Create an arrow pointing right like this:
- Click on Input. Click and drag an on button A pressed block to the coding area and drop it. Click on the small arrow next to A and click on B.
- Click on Basic. Click and drag a show icon block to the coding area and attach it within the on button B pressed block. Change the icon by clicking on the white arrow to a happy face.
- Click on Basic. Click and drag a show string “Hello!" block to the coding area and attach it under the show icon block. Now change the text to read Press button A + B.
- Click on Basic. Click and drag a show leds block to the coding area and attach it under show string “Press button A + B block.
Create a right and left facing arrow.
- Click on Input. Click and drag an on button A pressed block to the coding area and drop it. Click on the small arrow next to A and click on A+B.
- Click on Basic. Click and drag a show icon block to the coding area and attach it within the on button A+B pressed block. Change the icon by clicking on the white arrow to a happy face.
- Click on Basic. Click and drag a show string “Hello!" block to the coding area and attach it under the show icon block. Now change the text to read You now know how to use the buttons!.
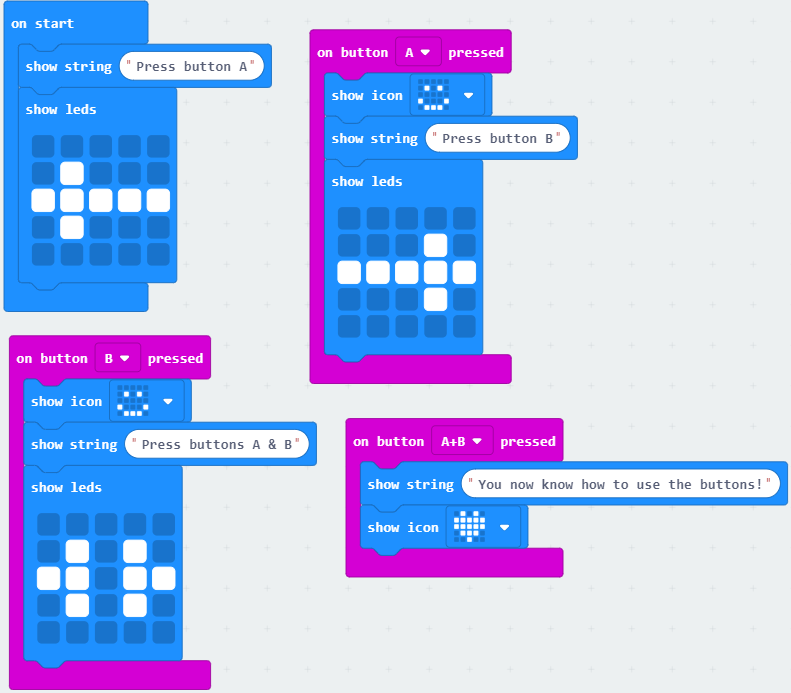
Your completed code should look like this:
EduBlocks
Here is how to use buttons within EduBlocks.
- Open EduBlocks within your favourite browser and click on micro:bit.
- Click on Basic. Click and drag a **from microbit import *** block to the coding area and drop it.
- Click on Display. Click and drag a display.scroll(“Hello World”) block to the coding area and attach it under the **from microbit import *** block.
- Click where it says Hello World and delete it, now type Press button A.
- Click on Basic. Click and drag a sleep(1000) block to the coding area and attach it under display.scroll(“Press button A”).
- Click on Display. Click and drag a display.show(Image.HAPPY) block to the coding area and attach it under sleep(1000) block. Click on where it says Image.HAPPY and delete it, now type Image.ARROW_W.
- Click on Basic. Click and drag a while True: block to the coding area and attach it under display.show(Image.ARROW_W) block.
- Click on Basic. Click and drag an if True: block to the coding area and attach it within the while True: block.
- Click on Buttons. Click and drag a button_a.is_pressed() block to the coding area and attach it within the True of the if True: block.
- Click on Display. Click and drag a display.show(Image.HAPPY) block to the coding area and attach it within if button_a.is_pressed block.
- Click on Basic. Click and drag a sleep(1000) block to the coding area and attach it under display.show(Image.HAPPY)
- Click on Display. Click and drag a display.scroll (“Hello World”) block to the coding area and attach it under the sleep(1000) block.
- Click where it reads Hello World and delete it, now type Press button B.
- Click on Display. Click and drag a display.show(Image.HAPPY) block to the coding area and attach it under display.scroll(“press button B”).
- Click where it says Image.HAPPY and delete it, now type Image.ARROW_E.
- Click on Basic. Click and drag an if True: block to the coding area and attach it under the if button_a.is_pressed(): block.
- Click on Buttons. Click and drag a button_a.is_pressed() block to the coding area and attach it within the True of the if True: block. Click on the little arrow next to a and click on b.
- Click on Display. Click and drag a display.show(Image.HAPPY) block to the coding area and attach it within if button_b.is_pressed block.
- Click on Basic. Click and drag a sleep(1000) block to the coding area and attach it under display.show(Image.HAPPY)
- Click on Display. Click and drag a display.scroll (“Hello World”) block to the coding area and attach it under the sleep(1000) block.
- Click where it reads Hello World and delete it, now type Well done! you now know how to use buttons!
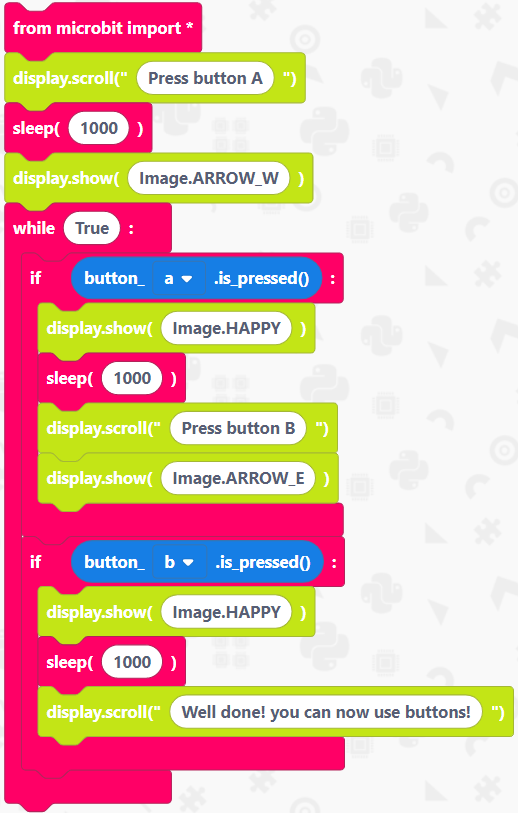
Your completed code should look like this:
Python
There are two common ways to program the micro:but using microPython. The first one is to open the web version in your browser Python or by downloading the Mu editor from downloading Mu (within this post I am using Mu)
- Open your preferred method for programming Python.
- Type
from microbit import *this will import the micro:bit library to use with Python and press enter. - Type
display.scroll("Press button Athis will display press button A scrolling accross the LED matrix. - Type
sleep(1000)This will pause the program for 1 second. - Type
display.show(Image.ARROW_W)this will display a left facing arrow on the LED matrix. - Type
while True:this will make the code loop forever. - type
if button_a.is_pressed():this will run the next lot of code only if the A button on the micro:bit has been pressed. - Type
display.show(Image.HAPPY)this will show a happy face on the LED matrix. - Type
sleep(1000)this will pause the program for one second. - Type
display.scroll("Press button B")this is will scroll Press button B accross the LED display. - Type
display.show(Image.ARROW_E)this will display a right facing arrow on the LED matrix. - Type
if button_b.is_pressed():this will execute the next bit of code if button B is pressed. - Type
display.show(Image.HAPPY)This will show a happy face on the LED matrix. - Type
sleep(1000)this will pause the program for 1 second. - Type
display.scroll("Well done! You can now use buttons!")this will scroll accross the LED matrix.
Completed code
from microbit import *

display.scroll("Press button A")
sleep(1000)
display.show(Image.ARROW_W)
while True:
    if button_a.is_pressed():
        display.show(Image.HAPPY)
        sleep(1000)
        display.scroll("Press button B")
        display.show(Image.ARROW_E)
    if button_b.is_pressed():
        display.show(Image.HAPPY)
        sleep(1000)
        display.scroll("Well done! You can now use buttons!")
Challenge
Now that you know how to use the buttons on your micro:bit why not go back to to last weeks challenge and add more to your name badge so different messages or images display when you press a button.
Come back next week to learn about the radio function of the micro:bit.