Within this post we are going to get to know what we can do with the LED matrix on the front of the micro:bit.
I will include code for the MakeCode, EduBlocks and microPython editors.
Lets get started!
Displaying Text
The first thing we will look at is to display text on the micro:bit, This could be used to send messages or used as a name badge.
MakeCode
Here is how to display text using MakeCode:
- Open the MakeCode editor in your favourite browser MakeCode
- Delete the on start block by clicking and dragging it to the left odf the screen and dropping it on the recycle bin.
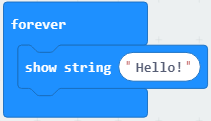
- Click on Basic. Click and drag a show string “Hello!" block to the code area and attach it within the forever code block.
- Click on Download to download the code to your computer.
- Plug your micro:bit into your computer using a microUSB cable.
- Navigate to where your code downloaded to, This will normally be the downloads folder on your computer. Copy the file to the MICROBIT drive.
Once the code has copied to the micro:bit you will see Hello! scroll across the LED Matrix.
Completed Code
EduBlocks
- Open the EduBlocks editor in your favourite browser EduBlocks
- Click on micro:bit.
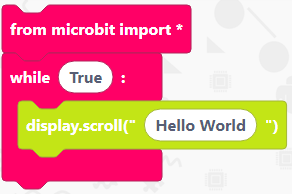
- Click on Basic. Click and drag a **from microbit import *** and drop it within the coding area.
- Click on Basic. Click and drag a while True: block to the code area and attach it under **from microbit import ***.
- Click on Display. Click and drag a display.scroll(“Hello World”) to the coding area and attach it within the while True: block.
- Click on Download Hex, this will download the code to your computer.
- Plug your micro:bit into your computer using a microUSB cable.
- Navigate to where your code downloaded to, This will normally be the downloads folder on your computer. Copy the file to the MICROBIT drive.
Once the code has copied to the micro:bit you will see Hello World scroll across the LED Matrix.
Completed Code
Python
There are two common ways to program the micro:but using microPython. The first one is to open the web version in your browser Python or by downloading the Mu editor from downloading Mu (within this post I am using My)
- Open your preferred method for programming Python.
- Type
from microbit import *this will import the micro:bit library to use with Python and press enter. - Type
while True:this will create a while True loop meaning that the code inside it runs forever press enter. - Type
display.scroll("Hello World")This will display Hello World on the micro:bit LED matrix forever. - Plug your micro:bit into your computer using a microUSB cable.
- Click on Flash, this will download the code to your computer (if this gives you an error click flash again and it should work).
Completed code
from microbit import *

while True:
    display.scroll("Hello World")
Displaying Images
The other thing we can use the LED matrix for is displaying images. Let’s look and see what we can do by expanding on the code above.
MakeCode
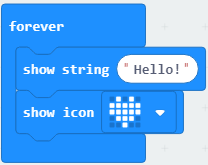
- Click on Basic. Click and drag a show icon block to the code area and attach it under the show string “Hello! code block.
- Click on Download to download the code to your computer.
- Navigate to where your code downloaded to, This will normally be the downloads folder on your computer. Copy the file to the MICROBIT drive.
Once the code has copied to the micro:bit you will see Hello!+heart scroll across the LED Matrix (see the simulator below).
you can also change the icons by clicking the white arrow next to the heart.
Completed Code
EduBlocks
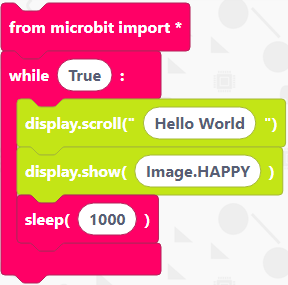
- Click on Display. Click and drag a display.show(Image.HAPPY) block to the code area and attach it under the display.scroll(“Hello World”) code block.
- Click on Basic. Click and drag a sleep(1000) block to the code area and attach it under display.show(Image.HAPPY)
- Click on Download Hex to download the code to your computer.
- Navigate to where your code downloaded to, This will normally be the downloads folder on your computer. Copy the file to the MICROBIT drive.
Once the code has copied to the micro:bit you will see Hello Wold +a happy face scroll across the LED Matrix (see the simulator below).
you can also change the icons by typing a name of an image all in CAPS after Image. here is a list of supported Images Supported Images
Completed Code
Python
- Type
display.show(Image.HAPPY)and press enter. This will display a picture of a happy face. - Type
sleep (1000). This will pause your program for 1 second. If this isn’t included your program will skip over the happy face. - Click on Flash to download the code to your micro;bit.
Once the code has copied to the micro:bit you will see Hello Wold +a happy face scroll across the LED Matrix (see the simulator below).
you can also change the icons by typing a name of an image all in CAPS after Image. here is a list of supported Images Supported Images
Completed Code
from microbit import *

while True:
    display.scroll("Hello World")
    display.show(Image.HAPPY)
    sleep(1000)
Challenge
Use what you have learned within this blog post to make a custom Name badge.
Conclusion
That’s all for Today! Come back next week to learn how to use the buttons.