This week in micro:bit Monday we are going to discover how to use the micro:bit to detect light.
The micro:bit doesn’t have a light sensor built in, but we can use the LED matrix to detect how much light there is in a room. This can be then used to make a night light, or a light for the front of a scooter or bike or even just attached to you and it will turn on when it starts to get dark.
Let’s take a look at the code.
MakeCode
- Open MakeCode within your favourite browser
- Click and drag on start to the left and drop it in the bin
- Click on Logic Click and drag a if true then else block to the coding area and drop it inside the forever block
- Click on Logic Click and drag a 0 < 0 block to the code area and attach it within the ** if** block where it says **true**
- Click on Input Click and drag a light level block to the code area and attach it wihtin the first 0 within the if block type 100 within the second 0
- Click on Basic Click and drag a show leds block to the code area and attach it within the if light level < 100 then block Click on all the squares to turn them white
- Click on Basic Click on more Click and drag a clear screen block to the coding area and attach it within the else block.
You are now ready to download the code to your micro:bit and detect light.
Completed Code

EduBlocks
- Open EduBlocks within your favourite browser
- Click on Basic Click and drag a **from microbit import *** to the code area and drop it
- Click on Display click and drag an image = () block to the coding area and attach it under the **from microbit import **. Replace all the 0 with a 9
- Click on Basic Click and drag a while True block to the coding area and attach it under the image = () block
- Click on Basic Click and drag an if True block to the coding area and attach it within the the while True block
- Click on Basic click and drag a 0 < 0 block to the code area and attach it within the True of the if block. Click on the first 0 and type display.read_light_level() click on the second 0 and type 100
- Click on Display Click and drag a display.show(Image.HAPPY) block to the code area and attach it within the if display.read_light_level() < 100: block
- Click on Variables Click and drag a image block to the code area and attach it within the display.show block where it says Image.HAPPY
- Click on Basic Click and drag an else block to the code area and attach it under the if block
- Click on Display Click and drag a display.clear() block to the code area and attach it within the else block.
Your code is now complete and ready to download to your micro:bit.
Completed Code
Python
- Open your favourite Python editor
- Type
from microbit import *This imports the micro:bit library - Type
while True:This creates a loop that runs while the conditions are True - Type
if display.read_light_level() < 100:This checks that the light level is less than 100 - Type
display.show(Image("99999:" "99999:" "99999:" "99999:" "99999"))This makes the LED display light up if the light is less than 100 - Type
else:This creates a condition for when the light is 100 - Type
display.clear()this clears the LED matrix.
Your code is now complete and ready to download and run on your micro:bit.
Completed Code
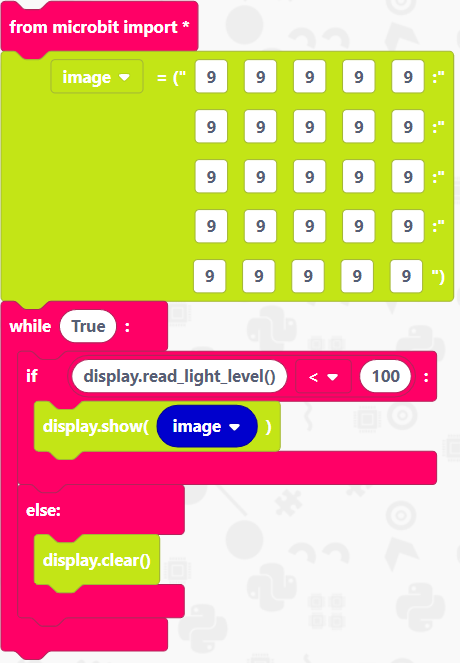
from microbit import *

while True:
    if display.read_light_level() < 100:
        display.show(Image(
        "99999:"
        "99999:"
        "99999:"
        "99999:"
        "99999"))
    else:
        display.clear()
Conclusion
That’s it for another week! Come back next week where we will be looking at the micro:bit tilt function.